


Products are selected by our editors, we may earn commission from links on this page.
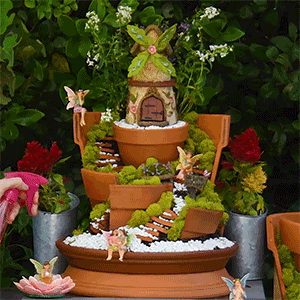
Decorative Garden Planter

Materials:
- large terracotta planter
- small terracotta planter
- soil
- decorative pebbles
- decorative moss
- flowers
- decorations of your choice!
Instructions:
- Break the large terracotta planter in half or 1/3 of it. Keep the broken pieces!
- Pour a decent layer of soil into the planter.
- Take a broken piece that includes the rim and break it again. Take the 2 pieces and stick them in the soil. Place the smaller piece near the bottom of the soil pile and the larger piece higher up in the soil.
- Add in some more soil to smooth out the “hill.”
- Place a small terracotta planter in the bigger mound of soil near the top. Fill in around it with more soil to stabilize it. Also, fill the planter with soil until it’s completely full.
- If you’re out of pieces from the first terracotta planter, break another one, but into much smaller pieces. These pieces are going to be the stairs leading up your hill.
- Stick the small pieces horizontally into the soil to create the steps.
- Line the gaps between each step with decorative pebbles. They can be any color of your choice. We used white!
- Place more pebbles at the base of your planter and at the very top of the hill.
- Line the stairs with faux moss.
- Add some flower bulbs to the back of the planter at the top of the hill.
- Complete with any decorations of your choice!
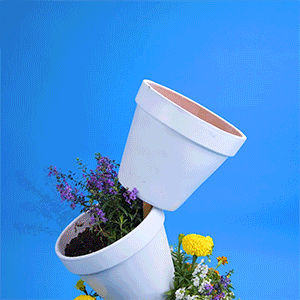
Tipsy Planters
Materials:
- large terracotta planter
- gorilla tape
- cement powder mix
- water
- tall wooden dowel
- spray paint (color of your choice)
- several bags of soil
- gardening trowel
- medium-sized terracotta planters
- industrial strength glue
- various flowers of your choice
Instructions:
- Cover the hole at the bottom of the largest terracotta planter with waterproof tape (ex: duct or gorilla tape)
- Pour in the cement powder mix and water.
- Mix with a wooden dowel.
- Stick a tall wooden dowel into the mixture and let it set.
- Optional: spray paint the exterior of the planter. Let dry.
- Fill in the remaining space of the planter with soil.
- Use a trowel to smooth out the surface of the soil.
- Thread another, smaller, planter (painted if you want) through the wooden dowel.
- Rest it in the soil at an angle and hold it in place with industrial strength glue.
- Repeat steps 9-10 until you’ve run out of space with the dowel.
- Fill each of the planters with soil.
- Plant flowers in each of the planters.
- Optional: decorate the planters however you’d like.
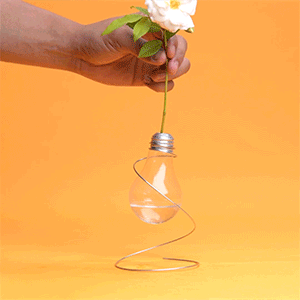
Lightbulb Vase
Materials:
- protective gloves
- clear incandescent lightbulb
- needle-nose pliers
- small screwdriver
- slotted screwdriver
- Aluminum crafting wire
- water
- flowers
Instructions:
- Using needlenose pliers, pull off the metal disk at the base of the lightbulb. You should be wearing protective gloves to keep your hands clean from any potential broken glass!
- Take a small Phillips head screwdriver and pry off the black base of the light bulb. It’s ok if the plastic breaks. Use the needlenose pliers again to pull any remaining plastic out.
- Use a flat-tipped screwdriver to unscrew the lighting element inside the bulb. Use the needlenose pliers to reach in an extract it.
- You should be left with the empty case of a light bulb. Feel free to rinse it out in case there are any small bits of plastic or glass still inside of it.
- Mold the aluminum crafting wire to act as a stand. Pull it apart and mold the top of the stand to fit the base of the light bulb so you can screw it in and make it secure.
- Pour some water into the bulb and add a few flowers.